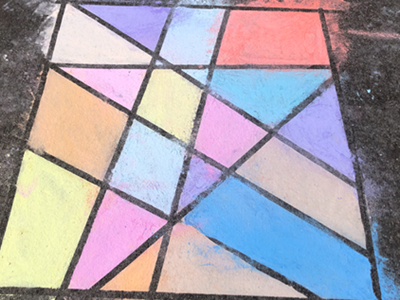
Angles: chalk designs: Part 2
Year level: 4
Strand: Measurement
Lesson length: 60 mins
In this second of two lessons, students create their own chalk designs in the style of a stained-glass window that includes different types of angles.
In a previous lesson, Angles: types of angles, students explored ways to compare angles and recognise the names of the different angles, including right angles, acute angles, obtuse angles, straight angles, reflex angles and revolutions.

Curriculum information
Achievement standard
By the end of Year 4, students compare angles relative to a right angle using angle names.
Content descriptions
Students estimate and compare angles using angle names including acute angle, obtuse angle, straight angle, reflex angle and revolution, and recognise their relationship to a right angle. AC9M4M04
General capabilities
Numeracy
- Understanding geometric properties Level 4
Critical and Creative Thinking | Inquiring
- Identify, process and evaluate information Level 3
Digital literacy
- Manage content Level 3
Assessment
- Use observation and informal conversations to access students’ proficiency in identifying, describing and representing right angles, acute angles, obtuse angles, straight angles, reflex angles and revolutions
Areas of challenge
Some students may:
- have relatively limited experience with angles, how angles are measured, the names of different angles and their relationship to right angles
- not yet be familiar with the idea that angles are measures of turn and that we can estimate the size of angles using a right angle as a starting point or benchmark
- be unfamiliar with the names of the different angles, so it will be important to create a visual chart to help them to become more familiar with the names of the different angles and how the size of each angle can be compared to a right angle.
Prerequisite student knowledge and language
Prior to this lesson, it is assumed that students have knowledge of:
- angles as measures of turn
- how to compare angles to right angles (greater than or less than) in everyday situations
- how to identify patterns of geometric shapes in the environment.
What you need:
Lesson plan (Word)
Teacher’s slides (PowerPoint)
Angle checker made by each student in previous lesson
Masking tape, coloured chalk and a safe marked-off area of concrete or asphalt within the school grounds within which to create their designs
Learning goals
Learning intention
- We are exploring the properties of different angles.
Success criteria
By the end of this lesson, students can:
- recognise that angles are measures of turn
- identify the names of the different types of angles
- draw and label angles and describe their properties
- recognise the relationship different angles have to a right angle
- identify angles in everyday situations
- develop efficient strategies for recognising, representing and comparing angles.
Why are we learning about this?
Angles are all around us. They have real-life applications in design and in the way we describe and classify movement and shapes. Yet, all too often, we only think about angles when we are sitting in a mathematics lesson. These lessons have been designed to help students recognise the angles present in the world around them and start to help them explore the relationship angles have with each other.
Learning hook 5 mins
- Download and use the teacher’s slides to accompany your teaching.
- Use slide 2 to review angles and related terminology used to describe the different types of angles such as right, acute, obtuse, straight, reflex and revolution.
- Remind students that we can compare types of angles to a right angle.
Explore 45 mins
- Use slide 3 to introduce the task of designing a chalk design in the style of a stained-glass window.
- Organise students to work in pairs or groups of three.
- Explain that their task is to create a design that will include as many different types of angles as possible.
- As a starting point, ask students to individually draw a rectangular shape and create the stained-glass window effect by drawing intersecting lines. Students then share their initial design and use that to create an agreed group design on one piece of paper.
- Take students outside to the safe, marked-off area set aside to create their designs. Ensure each group has access to a roll of masking tape and coloured chalk.
- Once students have created their designs, do a reveal group by group.


Image credit:Cass Lowry
- Take digital images of each group’s design and provide access to these via a shared folder.
- Each group can then identify the different types of angles included in each design. They can use their angle checker to compare to a chart of angle types (slide 2).
- Students draw conclusions about their designs.
- Support prompts: What angles can you see in your design?
- Enabling prompts: Does your design have more acute angles than other types of angles? How do you know?
- Extending prompt: How many of each angle type is included in your design? Is there a type missing? If so, explain why.
Summary and reflection 10 mins
- Display the images of the chalk designs.
- Use them to identify types of angles.
- Students explain how they used their angle checker to work out the types of angles.